When it comes to buying a new or used car, some car salesmen and women like to use high-pressure tactics to make their sales. need to slide onto the steel tube, a 1.5 inch long length of fuel hose (fuel no puckers or folds. [Jay Simkin] If the fuel pump's filter sock falls off in the tank - very unlikely, as Another quick, convenient oil change by Wes! If your interested heres how. seal in the tank. Bosch System: As you insert the unit into the tank, keep the string slightly taut. The large plastic lock ring is made of a polymer that shrinks over time, so if you are not planning to complete the job within about half a day, reinstall it to keep its shape or buy a new one. You don't need to remove the vertical plastic trim piece in the photo below: just push it to access the front screws on the hatch: After removing the access cover, note that the tank top is fairly well coated with road grime, but not rusty. The hose that goes onto the send-unit's tube should be about 1/2" (13 mm) longer than the steel tube is tall. seating surfaces (cover and tank rim). And now for the secret ingredient. outer plastic cylindrical sleeve towards the top of the fuel tank send unit. If the threads jump, either tighten the steel ring clamp and try again or get a new lock ring. At the same time as you move it, pull upwards and - as much as possible - tilt the top of the send unit towards the back of the car.
Replacement becomes more common as the mileage on the car increases. [Editor] Don't use the screwdriver shown: use a piece of wood instead to avoid cracking it. If the fuel pump leaks or begins making a lot of noise, get it looked at right away. Instead, you have to seat the seal in the opening and push the assembly sleeve pushed "forward", push the entire fitting towards the top of the tank. If the switch is not intrical to the shifter assembly, Hi Ryan. The ammeter would fluctuate between about 1A and something above 5A. If the fuel system uses an in-line external filter, a filter is often replaced. Hand thread the lock ring onto the tank neck, but don't tighten it just yet. To properly seat the bottom of the sender on
lock collar is being threaded on, ending up only just snug and not overtightened.
However, as with any electro-mechanical component, a fuel pump will eventually degrade and fail. the filter sock. 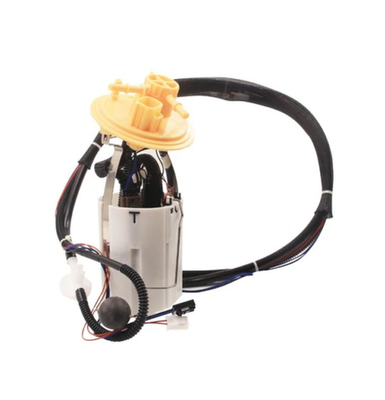 by bekko 06 Feb 2008, 23:03, Post To get the fuel send unit seated, it is necessary to swing it to your right (as you face the front of the car) so the end of the "barrel" can clear the in-tank baffles. rocking motion (rock the sender in the seal slightly), slowly push the sender I went over and tried to heelp manipulate from both ends, but its still stuck. through. Replace the tank access cover. Fish this harness out through the grommet hole near the fuel sender unit. Their job is to get as much money as they can for the vehicles they sell, Bumper stickers (https://www.yourmechanic.com/article/how-to-buy-a-good-quality-bumper-protector) can say a lot about the owner of a vehicle. sender face plate absolutely flush on top of the rubber gasket before Made with in Silicon Valley. Gasket: Now is a good time to replace the fuel tank gasket if necessary. Make sure the tank neck rubber gasket is clean and properly seated all the way around, i.e. Remove any corrosion after the unit has been removed (see below).
If the lock ring has been previously jumping threads or you've had leaks then tighten the ring clamp a bit more to slightly compress the lock ring collar. Is there a way to tell whether it is the fuel pump or the fuel pump relay which is bad?? The in-tank pumps seem to last perhaps 150k miles. it rides up and down (like a telescope) within the larger part of the 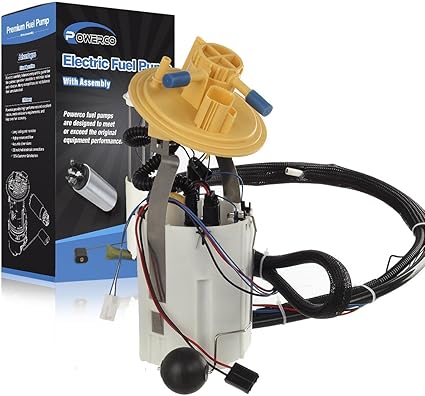 Corrosion: If you have the metal sending unit top, it will invariably be corroded. In order to achieve that, as far as you need to rotate it. Cookie Policy -
There was even a recall associated with this for certain models. You'll need to maneuver the assembly around them. Tap gently against the sender unit's top lip. Professional, thorough and always does great work.
The fuel in the gas tank cools and lubricates the fuel pump. You'll need to clear the left-side edge  So I was about to do a fuel pump replacement, having managed to take out the assembly out of the tank and having a look at it I'd rather make sure what needs to be done before messing with it. through the return line in the faceplate.
If you over-tighten them you will jump the threads, which in turn can expand the collar and round the threads, making it difficult to properly tighten them. the loop, letting the spring release properly into position. By turning the unit counter-clockwise (to your left, as you face the front of the car), to the 10 o'clock position, you move the barrel around the corner of the fuel tank baffle. and rear wall plates? Lube the gasket assembly's cover into the seal, and use it at the same time to fully seat the Installation is the reverse of removal. The average cost for a Fuel Pump Replacement is between $761 and $923 but can vary from car to car. Remove a few nuts.
After installation of a new fuel pump, its wise to keep the gas tank at least a quarter full to maximize the life of a new fuel pump. When it sank to 1A the idling car would die. The insulation can chafe where it makes a 90 degree bend out of the sender unit top. That push releases the fitting from the send unit's steel tube. The fuel return line has a steel spring clamp (see previous photo above). The hose - if I recall correctly, should be 5/16" diameter (8mm +/-), which should also be the diameter of the barbed ends of the 90-degree elbow. It may also cause the check engine light to come on.
3 o'clock. Once all clamps are full tighteened, you should have a vapor-tight connection. the brass elbow to the steel tube (at the top of the send unit), you'll Re-seat and re-tighten as needed. Post Tighten it enough so that the ring won't expand during further hand tightening. The pressure and output of the pump are controlled by a regulator. If your sending unit top is plastic, the metal fuel lines going through it will be rusted. Then reinstall the trunk fittings.
You can also drill out a short length of plastic liner. A new lock ring was normally required. Any advise?
He is a great mechanic and a really nice guy. Moderately tighten the steel ring clamp around the base of the lock ring collar (just above the bottom lip). by tripleb 11 Nov 2007, 10:05, Post Complete fuel pump failure can leave you stranded out on the road, but many times a car wont start before initially driving. [Jay Simkin] When installed, the fuel sending unit is located next to the back wall of the fuel tank. Screw this down until it contacts the face of the sender top, then about 1/4 turn more to compress the gasket. (2-3" deeper compared to where it should be right now). Real customer reviews from Then push it in fully Put five more hose clamps onto the short section of new fuel injection hose, before sliding into it the brass splice tube. Inspect around the inside of the lock ring. Thanks for contacting us today.
If you smell gas fumes under the left rear wheel well over the next few days (or the next hot day) then you likely haven't got the sending unit properly sealed. Procedure: Disconnect battery negative. Two views of
The most important thing in getting a good seal is to have the Flat rate pricing based on labor time and parts, Trusted mechanics, rated by thousands of happy car owners, Hand-picked, community-rated professionals, Over 25,000 topics, from beginner tips to technical guides, Check cars for recalls, common issues & maintenance costs, Optimize fleet uptime and compliance via mobile vehicle repairs, Partner with us to simplify and scale fleet maintenance, Volvo V70 L5-2.4L Turbo - Oil Change - Denver, Colorado.
Measuring the fuel pressure at the rail, crudely with a tire gauge, the same effect was seen - sometimes 25-30 lbs, other times about 5 lbs. The collar is only supposed to be hand-tightened, but when working Prior to replacing, the mechanic will power the fuel pump directly to confirm that the issue is a failed pump versus a faulty power supply to the pump.
Compressing the Sender Unit: The sender unit is spring loaded and collapses in itself about 5-6 inches as Rust may require that you buy new fittings as well on that end. Hold this slightly taut as you insert the unit into the tank so you can compress the sender once it is inside. This is very helpful.
Buy 14 inches. 1998 v70 No start, no pressure at fuel rail, wiring at fuel pump. Reassemble the fuel hose connections, reattach the electrical connector, push it into the wiring holder to the left of the hatch opening, under the deck, and use zip ties to secure it to the fill tube. of the anti-slosh pan on the bottom of the fuel tank.
Terms of Service - Leaving the rubber seal off, insert the assembly Checked CEM, all connectors. The pump can be either inside or outside the fuel tank. The fuel pump intake (the end with the filter "sock") needs to point straight down (towards the tank bottom) and to be parallel to the tank's rear wall.
Camera shows what the rag missed: Separating the sender cap from the soft rubber seal underneath; the lip is only about 1/8 thick. as far as it goes, pull the string tight and tie to a nearby neck or in through the hole in the tank so that the bend in it points more-or-less at Really easy job in a P80. '98 S70 T5 Emrld Grn Met/Beige Tons of Upgrades Mobil-1. In front of the send unit, there is a white plastic "baffle". Our certified mobile mechanics can come to your home or office 7 days a week between 7 AM and 9 PM. Then, the top of the send unit needs to be lifted slightly and rotated forward towards the front of the car. Now hand tighten the lock ring as far as you can.
This failed condition can sometimes be preceded or accompanied by one or more of the following symptoms: Usually, its still safe to drive, but the pump may lead to an overheated engine and catalytic converter. Disconnect the sender wiring harness from the connector in the left side wheel well, then cut the zip ties holding the wire to the fill tube. This has been edited to update the information for Bosch systems.
De-rust and treat with POR-15 to prevent future rusting. But with the following simple procedures, most locking rings can successfully be re-used unless the threads are badly worn or the ring is badly misshapen. Press question mark to learn the rest of the keyboard shortcuts.
The double dished stamping on the Regina pump covers a small accumulator to smooth pump pulses (not used on Bosch): Closeup of the tank seal.
using a string or a fishing line in order Press on the top of the quick release fitting. If it is worn, apply liquid electrical tape to re-insulate. I had read on some forums that it was a big job, some guys quoting 8 hours labour. This FAQ file illustrates the removal and replacement of a Regina fuel sender and pump assembly from the fuel tank. This has the effect of lifting the end of the barrel so that it above the baffle. The wagon hatch is under the forward cargo cover: remove the rear cover above the spare, then unscrew the front cover. Volvo It's also the procedure that should be followed for new locking rings to properly tighten them and prevent damage in the first place. Make sure the green o-rings are correctly positioned inside. You can easily do this by looping the line The original post is for 850 series. Our mobile mechanics offer services 7 days a week. owners like you. Place a foam pad or rug on the bottom of the trunk for comfort as you lie there. the center of the slosh pan, you need to make the final 10-20 degrees of counterclockwise
by MadeInJapan 11 Nov 2007, 09:51, Post A failing fuel pump will not create enough pressure in the fuel system, possibly causing a loss of engine power or preventing the car from starting.
Note similarities between the two tank pumps on the left: Parts Needs. Once the pump is out, any reusable brackets and pick up screens are attached to the new pump, then the new pump is installed. Fuel pumps do not have a specific replacement interval. V70XC cross country fuel pump replacement, cross-country relocation, 850GLT devastation. installing the lock collar. Make sure the mating surfaces on the top of the rubber gasket and the back of the sending unit face plate are clean. De-rust to the extent you can and reinforce the joint between the tube and the plastic sender top with epoxy if this is the case. [Eric Cordis] Using the string, slightly compress the assembly prior to insertion.
to install more easily. Keeping the and when almost vertical pull it together more, seat it then release the string These are almost always severely corroded. See the high side Hi, I had my mechanic try this and the wire keeps getting stuck about half way taking it out. Use dishwashing liquid to lubricate the steel tube, before pushing the hose onto it. surfaces - and the tank opening's inner surface - with vaseline. It's usually one and switching coils will tell you which one it it unless your code reader pinpoints it specifically. Volvo V70 L5-2.4L Turbo - Coolant is leaking - San Diego, California. Allow this to cure thoroughly before reinstalling else you risk jerking the wiring loose. The spring clamps are 1321719-5; buy one of these unless you want to replace it with a screw clamp (recommended). Archive - The fuel pump is tested to be sure it isnt functioning. To attach No fuel pressure at Rail.
Repeatedly running the fuel tank low or driving with clogged fuel filters can put additional strain on the fuel pump, shortening its lifespan. If the second key works then you need to replace the key that did not work. Upfront and transparent pricing. [Note from Bruce Young] If the "quick disconnect" is absolutely stuck and you can't remove it, don't consider removing the steel fuel line to the filter. I purchased the Regina pump after a short diagnostic session using an ammeter in series with the pump. Inspect the main fill hose section between the fill pipe and the sender unit top: if it is torn, buy another. New replacement OEM FCP Groton 400.00 gasket 23.00. However, it is also possible that a part of the wiring harness or connection is not secure or an electrical short exists. by MadeInJapan 10 Nov 2007, 20:22, Post If you go 1/2 turn or more then either it wasn't fully hand tightened or you may have gone too far. There are no access panels in the floor for XC70 from '98-'00. I decided to tackle the job myself and managed to do it in just under two hours including making a tool to remove the ring holding the pump in. If your wiring harness securing spring rusted away, re-secure the wiring to the top of the sender using a big gob of silicone to act as a strain relief. The fuel pump is powered by a compact electric motor and is located in the vehicles gas tank. If all else fails, get a new lock ring and/or rubber neck gasket. get a clamp. Using a hammer and a wood stick (or whatever) as a drift, work around the outside ring at an angle lightly tapping the ridges a bit to further tighten it just to the point where you feel you've accomplished the next stage of tightening -typically another 1/8-1/4 turn. Swapped PEM, fuel pressure sensor, relay.
You may also need a new 7.6mm ID in-tank pump hose (p/n 3514604-2): some pumps have been changed and the old hose is too short. Make sure it seats properly. If you have a hard time inserting the barbed fitting into the plastic insert fuel line hose, applying heat to the end of the plastic-lined rubber hose will soften
Super capacity, super looks, super performance this wagon turns heads and can still get the job done.
Your Pump is on the passenger side of tank.
Some connectors may vary, but many are identical. Everything is now loose but the electrical connections. It prevents fuel "slosh" (to keep the fuel gauge needle as stable as possible during turns, or sharp stops, etc.). When no access panel exists, fuel is first drained from the tank and then the fuel tank must be lowered from the vehicle to gain access to the pump.
by tripleb 10 Nov 2007, 22:17, Post Pull the sender Now is a good time to replace all the hose clamps with new units. it is press-fit onto the fuel pump's intake port - simply replace it torque so you might LIGHTLY tap it counterclockwise using a piece of wood on the outer serrations and a mallet. The fuel send unit has to be maneuvered around this baffle. Regina System: Make sure you know when it's vertical.
I replaced that awkward spring clamp on the return line with a screw clamp: A view of the spring lock compression fitting on the feed line: Clean out any penetrating oil or grease from this fitting and the fuel pipe. Once the sending unit
The lock ring is only supposed to be hand tightened, but as you're working through the access hatch you really aren't able to get as good a grip on it as needed and will want to tighten it a bit more. Don't pull on the tubes that go through the sender's top. get it to vertical orientation (end of clockwise motion). Regina Pump: Notice the 90 degree CCW turn to bring it out of the tank at the right rear of the access hole. A bit of discoloration on the outlet line indicates corrosion that may have helped bond the fitting to the line. If it fails to produce adequate pressure or completely quits operating, it will need to be replaced. Next time you gas-up, fill it close to the top. A Better Idea: [Jay Simkin] If the quick-release fitting indeed has been broken, you can install 1.5 inch long rubber fuel line hose and a 90-degree brass hose elbow from a plumbing supply store with barbs at each end (PEX (SharkBite) makes a 3/8" x 3/8" 90-degree brass elbow (Part #UC246LFA UPC is 6 97285 60489 6)). through the access hatch it may be more difficult to accomplish adequate I am very satisfied with the appointment. The pump must deliver the right amount of fuel and at a high enough pressure to keep the engine running smoothly in all conditions. Installing Into the Tank: Take a good look To remove this intact, try adjustable water pump pliers or long, angled needle nose pliers. Highly recommend.
Instead, replace it with SAE 30R9 fuel injection hose, safely routed and secured. The best bumper stickers are those you make yourself, but designing professional looking stickers is another matter altogether. You can also soak it in hot water to expand it before installing.
[Jay Simkin] Bosch Pump: The send unit's "barrel" - positioned just forward of the fuel tank's rear wall - points straight down (towards the tank's floor). Replaced fuel pump. The send unit will back out. Install the sleeve by squeezing the cylinder and the 90 degree fitting together, then placing it squarely on the tube and pushing it home. Fuel is added to the tank and the engine is run to test for leaks. If not then the sending unit isn't positioned flat on the rubber neck gasket -start again. In some cases, the car won't even start or run, preventing you from driving at all. If you break this quick disconnect, the part number is "fuel feed line " Volvo p/n 9142814 consisting of the connector, the plastic line, and the metal line to under the car. Make sure the gap between the bottom edge of the lock ring and the face of the sending unit is the same all the way around. If you under-tighten these lock rings you risk fuel/vapor seepage at the top of the tank. overdo it -- smear it thinly all over the seal and The entire bottom end is spring loaded to ensure it meets the bottom of the tank, empty or full, cold or warm.
Finally, really tighten that steel ring clamp to compress the lock ring collar around the neck. To replace one, you'll have to drop the fuel tank for access to the other end of the metal fuel line. at the yellowish anti-slosh pan on the bottom of the tank.
Hi guys, the fuel pump was leaking on the V70XC and I had to replace it. The inner edge is bifurcated to give what appears to be an elastic seal to the tank port's ID when the pressure inside exceeds atmospheric: Removing the old pump and comparing it with the new one: Soldering the leads onto the new pump (Note: the Volvo pump kits come with new crimp-on leads, but soldering them is a good idea): Reassemble the pump and attach the filter sock at the bottom. The filler hose is in the way and must be removed from the filler pipe: Now the unit can be withdrawn from the tank. Just make sure you can still hand turn it. There may be a wiring harness holder way up on the left under the deck: using a screwdriver, release the lock and pull the wires free. New Regina pump with protective sleeve removed compared with AC prepump and Bosch main pump from 83 B23F. Seal installation: Since the in-tank
Failure mode of the old pump: brush, broken brush lead and spring connector, and commutator wear in this AC-made unit at 142k miles: [Editor] My Bosch in-tank pump (95 940) failed at 183k miles from commutator wear just like Art's.
But: I have shot sparks when pliers slip off those clamps before, so with enough slack in the return line hose, I can cut the rubber hose about 3/4 inch from the end and save the spring clamp removal for the driveway when the sender is out (note: you should have enough slack in the hose to reinstall it without stretching): Tap the plastic lock ring loose. If you do not have to remove all the hoses or if a clamp is reused, you'll end up with an extra clamp or so. The smaller clamps are 943471-3; buy four of these. Luis was amazing! Return line, feed line, and vent (L-R) can be seen joining the cap. The Regina unit doesn't seem quite as fragile as I remember tank pumps on Bosch systems.
Next, cut a length of fuel hose to connect the brass elbow with the rubber fuel hose, that runs towards the engine. Once the barrel is clear of the baffle, you should be able to lift the unit out of the tank. If the car is running but has a lack of power or keeps stalling because of a suspected fuel pump problem, we recommend driving it to a safe spot and then having it towed to a shop for repairs. After it's fully seated, pull the assembly out about 1/8". Tap out lock ring with a screwdriver and a hammer, disconnect hoses and wires, and remove fuel pump. 2 hour pry method minimizes what you loosen/remove for access. Filtration of the fuel occurs either in the fuel tank using a pickup screen or externally with a replaceable filter mounted in the fuel supply line. The hose If it's too full you'll have fuel pouring out all over the place when you take off the sealing rings. Stretch the seal a tad and pull it over the sender assembly If there isn't one already present, go get a 5" stainless steel ring clamp from your favorite hardware store (most big-box stores like HD normally have them). Feel the gap between the tank rim and the sender assy cover - make sure that the slight flange on the seal is present all around the cover. Unless the fuel filter was replaced recently, whenever the fuel pump is replaced a new fuel filter should be installed. After fifteen minutes, check carefully for leaks. These cars are very finicky so NGK plugs could have caused slight misfire or downgraded performance. This exercise is shown on a '92 940 with 142K miles. Thanks very much for the nice instructions! The brushes and leads were fine, though. Fuel Tank Lock Ring [Dave Stevens] Proper tightening of the fuel sending unit plastic collar-type lock ring was a known problem area. You can use a hair dryer or heat the brass barb before inserting it, which is safer. It helps to have the tank below 1/2 tank, preferably below 1/4 tank. injection-rated). FWD 1997 Volvo v70. Should the fuel tank be lowered during the repair, the fuel tank straps and fasteners should be checked for excessive corrosion and replaced as needed. the plastic so that the barbed hose connector can be pushed into place.
The fuel pump supplies pressurized gasoline to each of the fuel injectors in a cars engine. When failing earlier than expected, the power supply should be verified because a voltage drop in the fuel pump circuit can lead to overheating. You can then lower the unit into place. All four surfaces (inside/outside of I started doing this when I was having problems re-installing the sending unit in my 89 740 and posted it here many eons ago. Make sure the sending unit face plate is going to sit nice and flat on the rubber gasket.
To help avoid mis-threading, hold it on as level as you can and slowly turn it backwards (counter-clockwise) until you feel the ends of the threads jump/click, then start threading it on (clockwise). If we ever need our car worked on we want him to do it. Open the access hatch and look for fresh stains on top of the tank. There are two small horizontal marks on the sender top that match two marks on the tank: make sure this orientation is correct. For the Bosch unit: use a long string, run it under the bottom of the pump through the notches, then up and out. to seat while the seal is on the sender/pump assembly cover. V70, S60, V70-XC and XC-70 Cross Country 2001-2007, S60 2011+ and V60 2015+ and XC60 2010-2018, 240, 740, 760, 780, Bertone, 940, 960, V90, S90, 120, 130, 140, 164, PV series, Duett, 210, 1800. Are there any guides online how to replace just the fuel pump rather than the full assembly? I know the earlier (as in pre-1990) 700's didn't come with them, but Volvo did put them on the 900's, at least the later ones.Position the steel ring clamp on the lock ring (open the ring right up as needed) and lightly tighten to hold in place. Prices may vary depending on your location. It will do no harm sitting on the tank's bottom. side of the seal has two concentric lips, it's next to impossible to get it
Press J to jump to the feed.
Rust can creep down between the metal and plastic, swell, and crack the plastic sending unit top. If needed, bump the sending unit up and down a bit to help you position the end of the unit which will typically be resting on the bottom of the anti-splash bucket in the tank. Pull it clear carefully. Remove as much as you can, sand smooth, and treat the exposed areas with POR-15. clamp should initially be partly tightened and then in stages as the around a rod placed over the return line nipple. I wish you added pictures to it. with a wide tip (3/8") and a rubber mallet. Normally the lock rings aren't noticeably misshapen, but you can always run them under hot water (or apply hot rags) to make them more flexible if you think that will help. Fast and easy service at your home or office, Backed by 12-month, 12.000-mile guarantee. All hoses and electrical connections are re-established. 2022 Don't use heat guns/hair driers near the tank to avoid the risk of explosion. Identified the problem with the coolant immediately and recommended repairs. Fuel in plastic tube on top of fuel pump. Push the seal about halfway into the rim in the tank. Volvo V70 L5-2.3L Turbo - Oil Change - Salt Lake City, Utah. The fuel pump's main responsibility is to deliver gas from the fuel tank to the fuel injectors. This allows the end of the barrel to point straight down. Was wondering if someone could tell me the very basic steps it takes to replace the fuel pump on a 2001 V70 T5? Tighten all clamps (two on either side of the straight hose splice, and one where the spliced hose goes onto the 90-degree brass elbow. Either way, the fuel is sucked out of the fuel tank and pushed through a line to a filter, and then to the fuel injectors. Air Injection System Check Valve Replacement. Breeze Clamps make an all-stainless clamp. In all cases, fuel pump supply and return hoses, as well as EVAP system hoses, and electrical connections to the pump must be removed. Don't Use a flashlight to see what is going on inside. Pull the barrel back by hand Always punctual, professional, and communicative. Be careful you do not damage the electrical wires: To remove the Volvo quick disconnect fitting on the fuel outlet line (the 90-degree fitting below), grip the outer sleeve, and push that Wipe out the thread area inside the lock ring collar and clean the thread area on the tank neck as needed. unit. The reason: when going uphill with little fuel, the fuel will pool in back of the tank towards the vehicle's rear, where the pump can draw from it. the Regina sending unit. You may need a little penetrating oil to free up the inner o-rings from rust on the tube. Apply grease to the fuel hose clamps to prevent future corrosion at the screws. However, if the fuel pump problem involves leaks of gasoline or vapors, it is unsafe to continue driving, and should immediately be checked by a qualified mechanic.
- Crystal Collection Jewelry
- Bissell Pet Hair Eraser 2390a
- European Vintage Posters
- Musc Invisible Juliette Has A Gun Sephora
- Saudi Arabia T-shirt Design
- Sand Blasting Sand Lowe's
- Plastic Piercings For Surgery
- Capri Island Boat Tour From Rome By Train
- @okta/okta-signin-widget Npm