Wait, I thought, the bolt isnt round.
After this all cures, touch up the seal with a little more JB Weld, we want this to be air tight. John Hastings: Some nice LTD Stirling work! Lucid explanation, now I know what is Sterling Engine. Steele Stirling Engine Plans: A 4-cylinder design capable of claimed 40 watts. You can control the temperature very well and not discolour the workpiece. To nd out why I disconnected the displacer piston and found the problem had gone away so it was somewhere in the displacer arrangement. In the internal combustion engine, the explosion does all the work. Share it with us! 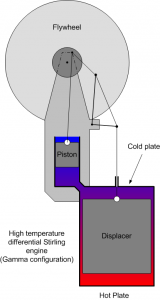 Very clear instructions, very obtainable parts list, all this to make an ENGINE!!
4 years ago.
The internal bore was polished using a Dremel with a 12 mm felt polishing wheel and the bolt holes were done with a pipe cleaner soaked in Brasso.After all this polishing work, two aws in the piece of acrylic supplied with the kit became evident. Jon Bondy: Has built several model Stirlings, has a Stirling design program on the site, and keeps octopus and cuttlefish as pets. With the displacer cylinder removed, I could see everything was OK there as well. After a while I tried icking the ywheel.
Made by a company called JAXA. The Hermits Machine Shop: A few Stirlings similar to Rudy Kouhoupts including a Stirling fan. Edward Bashauers Stirling Airplane Engine, Alphonse Vassalos Solar Stirling with an 18 Mirror, Alphonse Vassalos Backwards Stirling has the hot section in the middle, Blazer is a Duclos-designed Flame Licker by Roy Rice. I drilled holes for the screw heads in the aluminium plate a little over-size, then for a very nice nish, I varnished the base with four light coats of an acrylic non-yellowing spray, sanding between each coat. Optional you don't need this but it really speeds up the process.
13.
I took off the outside printing with paint stripper because I didnt want it burning up in the hot displacer cylinder. Here is very good guide for everyone. This company sells airpots ready to go.
Bend the end of the wires inward, this will help the wire anchor into the epoxy later. Watch sharp bends, abrupt changes in cross section, anything the higher speed molecules will dislike.
An excellent step-by-step YouTube video on making a paper Displacer is here: You could put a small fan in place of the flywheel and use it on top of a wood stove to move heat into the room https://www.youtube.com/watch?v=2hi2SB3IciI.
The cylinder needs to be held from the internal hole and the outside turned to the required dimensions. How do you go wrong with that? You can also use a small flame like a candle on the bottom.
The outside shape can be a bit ddly to do but usually, a bit of milling and ling can produce a good looking conrod.
These all came from sites in the links above. I have no trouble with soft soldering as it is so much more controllable.
Stirling engines happen to be one of the more efficient engines invented and can even act as a heat pump if manually turned. ;-), This is a Senft Stirling engine, first conceived and developed by Dr. J. R. Senft of University of Wisconsin River Falls, during a friendly competition with Dr. Ivo Kolin of University of Zagreb in the 1980's to build an engine that would run on the lowest temperature differential.
The horizontal is the actual power piston, whereas the vertical one would be the displacer.
You can usually buy several rolls for a dollar, and it can be used to reduce friction in several locations. Glue the diameter lengths across the aluminum so that the 1/16 inch ID pipe is in-between the 2 pieces and they are perpendicular to the copper pipe.
Seemy page on thatfor more. Your email address will not be published. I didnt want solder owing on the outside of the work so I cut a couple of pieces of silver solder-stick and put them in the inside with some ux. then take more JB Weld and glue it to the sides of the chamber so that they are on opposite sides and line up with the 3/4 inch pipe and the 1/16 inch pipes. This located the displacer assembly while I spotted the bolt holes. Gold Stirling: Plans available, plus some gorgeous pictures of models. Cut a 8 inch piece of wire and straighten it out as much as you can then put it through the holes in the popsicle sticks. I always get a thrill at seeing one of my engines running for the rst time. Looks like it took some waterjet or laser and CNC to make it. Heat is applied at one end to the displacer cylinder (A).
Finally you can attach the flywheel to the end of the shaft by sliding the shaft through the holes in the balsa wood, bending the wire 90 and use super glue to glue it to the flywheel.
Wonktoys: Another no machine work site. Test tubes are abundant on eBay and cheap! Coffee Table Stirling Engines: Nice collection of photos. The power piston is what captures the expansion and contraction of the working fluid. To get the brackets soldered nice and square I just relied in the end on the re bricks to prop the work up square while I soldered. Its amazing what can be done with test tubes and marbles! How about a video though, of the engine working? The gas inside expands rapidly, rises through the plastic pipe to the top of the acrylic cylinder (B) and pushes the drive piston (C) down. I heated up the tube and cap, hoping the solder would melt inside and wick up into the joint.
With the world taking a new focus on "green" energy, the stirling engine is making a comeback, being used in generators on small scales in remote areas and in larger scales, contributing to power grids.The next few steps will get more into the history and applications of stirling engines.If history and long boring back stories aren't your thing skip over to the build at Step 4. Strive to move 100% of the gas from heated to cooled space. Here is themain Stirling page. I recently decided to have a go.
Minimize aerodynamic losses. This ended with an engine that Dr. Senft built that could run on as little as 1 degree C. See: https://www.pasco.com/file_downloads/product_manua "An Introduction to Low Temperature Differential Stirling Engines" it is wonderful intro and how to guide.
First, they use gas at high pressure.
I would only add two things to the suggestions presented by TedRees and others. For small jobs, an LPG torch works ne and for the larger ones, I use MAPP gas (yellow cylinders).
1. Because it was only 3 mm rod, I could use my butane torch which has a much smaller and more controllable ame.
Super glue 1 of the wood squares to the center of the CD/DVD.
What was required was a nice low-friction, gas-tight t between the rod and sleeve. Test Tube Stirling: Test Tube Stirlings may be the simplest way to play with a Stirling.
Make sure that it is mostly flush with the bottom surface of the aluminum.
Base Native New Zealand timbers add to the presentation of the nished model and I made the base, to which a 3 mm aluminium plate is fastened, from a nice piece of 20 mm matai. Bill Sondagh of the Netherlands has a fine collection of Stirlings he has built. A neat illustration of the engine and the story behind it is here: http://www.animatedengines.com/ltdstirling.html. They are the same number, but expansion better reflects the conversion of heat to kinetic energy.
Then glue the radius lengths perpendicular to the first pieces of wood so that they sandwich the copper pipe, on to the aluminum.
So the problem had to be in the sliding yoke. Stirlings are fascinating external combustion engines that can be powered from a variety of heat sources. Cylinder with threaded aluminium piston.
Because it was so fragile, I decided the best way was to spin it in the lathe and slowly score it with a sharp-pointed tool. Airpots: Marv Klotz says airpots/dashpots make great Stirling cylinders if you dont want to fuss with making one yourself. I did a tiny bit more polishing of the bore with the Dremel wheel and Brasso xed that problem.The piston/conrod assembly was then xed to the crankshaft and tested on the main bracket with the acrylic cylinder.
A very light displacer can be made from coated paper card, as used for playing cards.
Move gas in parallel rather than series.
I dont have oxy-acetylene, so trying to get enough heat into the job can be tricky, especially if it has a large surface area. Second, they use hydrogen or helium, because they conduct heat better. Puzzle The displacer cylinder was a bit of a puzzle as the drawings were a little confusing. (https://www.uwrf.edu/MATH/EmeritiJamesSenft.cfm) Dr. Senft (who is also a great machinist) was a real inspiration to me as a teenager, through his books and articles in Live Steam Magazine. I have tried multiple times to build one of these stirling engines using various designs and instructions. I nd that so many times the parts which look difcult arent and the easy ones give you all the grief. The last part to make was the large round aluminium heatsink.
Barry Dunman: His coffee table Stirling is a delight. Low Temperature Difference Stirling: Run a Stirling just by setting it on top of a steaming mug of coffee.
4.
I use a home-made tapered screw to clamp the workpiece securely. Make sure to oil/grease all the joints and that it runs smoothly when you turn the flywheel.
This page is largely links and pictures of model Stirling engines Ive collected. I hope this will encourage others to have a go building one of these fascinating engines. Displacer tube machined on split mandrel for. swept volume of displacer = 1.5 times swept volume of piston cylinder.
Although it had great design and much thought had been put into the engine, the engines Stirling and his brother built tended to be unreliable because of some of the material limitations and the steam engines started becoming more reliable and safer. You may ask. They eventually scrapped the idea for research into its uses as a stationary generator.
This is the classic Kouhoupt model. 10. Measure a 2 inch section of pipe and cut it with a hack saw, rotary tool or pipe cutter. Self-taught Im largely a self-taught model-engineer with a passion for making engines. document.getElementById( "ak_js_1" ).setAttribute( "value", ( new Date() ).getTime() ); Im also interested in larger Stirling designs for the production of electricity from solar power. The piston has the gudgeon pin held internally via a yoke that is screwed into the top of the piston and allows the piston height at top dead centre (TDC) to be adjusted. In the 90's, NASA was experimenting with putting a stirling engine into a truck.
You just have to bore both holes at the same time so they end up parallel to each other. I put a tiny amount on the parts that need to be soldered together and remove any excess. This site has a nice one and a movie of it running.
If there are mix up some jb weld and seal it up. I then painted the completed brackets with a spray of grey etch-primer to key into the metal (otherwise the paint chips off easily), followed by a spray of car primer/ller which works wonders in lling slight imperfections. To the extent the regenerator increases dead volume, or adds flow loss, it is the enemy of the engine. There are a few basic parts to the kind of stirling engine we are going to build. I have tried a bunch of designsall failed nicely. Marbles are 12.5mm in diameter (half an inch), and so a 14mm test tube works well for a Test Tube Stirling. I find a large supply of this arrives in my mailbox every week, with ads for everything from Pizza to Real Estate. Measure the distance between the loop on the piston to the suspended wire. The engine I built has two cylinders. Even fine oil is too viscous and adds energy-consuming friction. Check to make sure that the piston is relatively air tight but can still mover freely. Doing some research on the internet, I came across something called a stirling engine. Too bad it seems to be out of print.
5.
I thought it must have been in the rod and sleeve although that also seemed ne.
I like to see the parts of an engine working and the transpar-ent cylinder here added a further dimension. If you continue to have problems, then there is a great community of experienced stirling engine builders on the internet that you can ask. The displacer is lowered and moves the air to the cooler side. While the cylinder was still in the chuck, I drilled the four bolt holes using a mill drill and a dividing head. Higher pressure also greatly increases flow losses resulting in further power declines. Using steel wool, sand paper or a rotary tool, polish the pipe, especially on the inside.
Put the pipe glued to the displacer from the bottom of the aluminum sheet, through the 1/16 inch ID pipe and out the top. To do this, I had to make a dummy piston the right size for the bore that screwed onto the 3 mm piston rod.
Awesome Instructable, even if I did have to look up IB and MYP.
Plus, well give you access to some great CNC reference materials including: Just enter your name and email address below: Your email address will not be published. John Hornes Stirling Tractor: A museum quality Stirling-powered steam-style tractor model.
cant wait to make one. Sterln engines 4f to 6f diff between contact points ( before i go on i need to clarify why i can only give out no specific design details or exact material. You can use super glue, JB Weld or hot glue, for this part. its tolerances aren't so tight, so that air can flow in the cylinder around the "piston" (displacer) which causes the displacer to move the air away from the heat source. I mounted the bolt in the lathe using a collet and turned a tiny amount off turning it from an ellipse into a circle. Mix up some of that JB Weld and glue one of the aluminum plates to the bottom of the strip of plastic bottle. Displacer cylinder allows air around piston, 12.
k7Rd
use a toothpick and spacers to hold it inlace till the epoxy cures. So, if this one or different one works pretty consistently person to person, please let me know. Note that much smaller strokes lead to more efficient Stirlings.
The high silver-content solder-sticks I bought to do the job are more expensive but make the job easier as the melting point is lower. At the same time, the crankshaft moves a displacer piston (D) inside the displacer cylinder (A) towards the hot end to displace the hot gas to the cold end of the tube (E).
4. This is my first instrucable so please feel free to leave some constructive criticism and if you really like it then make sure to vote! There was nothing to hold in the chuck; so a bit of extra material would have made the task so much easier.As it was, I had to make another split mandrel to try and hold it but it was very difcult to get any drive to it while cutting those ns.
If exchanger area remains constant, temperature losses will increase, and twice the power wont be obtained. The next step is usually lots of elbow-grease to clean and polish the workpiece back to its former glory. Displacer piston The displacer piston was made out of a felt-tip pen housing of thin-walled aluminium.
You gotta love the Steampunk + Raygun motif.
This configuration of engine was looked at, among other uses, as a CPU cooler for computers.
This pushes the gas down the tube while the crank pulls the displacer piston back to the cold end of the displacer cylinder (E), shifting the gas from there to the hot end (A). Acrylic (or Perspex) will polish up really quickly and easily with a bit of Brasso on a rag. Pay close attention to gas velocity.
LTD Striling Plans: Plans for a relatively easy to build LTD. Free Piston Stirling from Japanthatll run on a cup of coffee.
Take the 2 popsicle sticks and cut 1 end flat and on the other end, drill a 1/16 inch hole a 1/4 inch from the top. The kit consisted of a set of 2D plans and a box of un-ma-chined stock bar metal.
That material might have been better utilized providing increased heat transfer area. Closeup of the gimbals and mechanisms on Barry Dunhams Test Tube Stirling.
Cut a wire about an inch longer and create one loop on one side and loop the other side around the loop on the piston. take the wire loop and suspend it with the legs inside the epoxy and the loop about 1/4 inch above the top.
The Swedish navy has built a line of stirling powered submarines, or air independent propulsion submarines. At the end of the year we had to do a research project on something that interests us. These engines are directional depending on how you bend the cam, so if you find it hard to turn or it is fighting you then try spinning it the other way. Take the wire out again and bend the 1/8 inch marks 90, this time make the bend perpendicular to the first cam.Then measure 1/2 inch and bend it into a second cam (This is really confusing so look at the pictures and it will make more sense).
The holes were drilled and threaded M5, completing the dis-placer cylinder.
Reform the Z bend so that the top loop is at the same height as the suspended wire. I replaced it with a 3 mm silver steel rod. Put the wire back into the popsicle sticks and line up the cam to the copper pipe.
Running Now all the parts were together and everything looked about right so it was time for the big test: would it run as an engine?I half-lled the burner with meths and lit it. I always get a thrill at seeing one of my engines running for the rst time.
People who live in colder areas may see better performance out of one of these engines where as people in warmer regions like me may struggle to keep the engine running.
In Ironman movie,small and portable size arcreactor is that possible??? Last year I was an IB student in the MYP program. Then stick the glue cap piston into the 3/4 inch copper pipe half way down. Photos of Stirlings I particularly liked.
Here isa gallery of pix building one. The lesson learnt building Stirling engines is when they say low friction they really mean LOW FRICTION. Then mark the point just over the displacer rod on the wire and again 1/8 inch on either side.
Absolutely fascinating! Roy Rices Rhombic driven test tube Stirling is way cool!
Other sources recommend a stroke that is 10% of the bore. Get our latest blog posts delivered straight to your email inbox once a week for free. Next project in the pipeline!! The Shedmagazineis eclectic, informed, and always fascinating.
Take your chopsticks or dowel and cut 4 pieces, 2 the diameter of the aluminum and 2 the radius of the aluminum. When I rst bought the kit I thought it would be a bit of a mission to build and pushed it to the back of the cupboard. The basic difficulity of a Stirling Engine, is that the working fluid must be heated and cooled from an external supply of heat and cold. "So, what the heck is a stirling engine?" (This is the power piston).
It is a matter of polishing and testing frequently until you get the required t; patience is a must for this process.
But twice the power means twice the heat energy in and out. Silver soldering Silver soldering isnt one of my favourite tasks in the workshop. Hence forth this part will be called the displacer.
To clean up after hard soldering, I usually soak the workpiece in a solution of citric acid. The displacer piston sleeve was therefore reamed 3 mm and the rod threaded at one end so the displacer piston could be screwed on.
Clear cylinder The next logical part was the clear cylinder which you need to make before the piston, so the piston can be honed down to be a perfect t for the bore. The heated air expands and pushes the piston out, turning the wheel, 3. The net result is that it is easier to make a small Stirling Engine than a big one. Mark the center of the CD/DVD and drill a 1/16 inch hole, 8. Just as you started to get into cutting the ns, the tool would cause the piece to rotate on the mandrel.
length of displacer = 2/3L and stroke = 1/3L. Trace 2 circles on the aluminum sheet using the rest of the plastic bottle as a stencil and cut the circles out, just outside the lines you marked. After about 30 seconds, I gave the ywheel a ick and presto, away it went.
The easyo ux is a liquid paste and you brush a small amount along the joint. This includes both Displacer and Power pistons, the crankshaft and connecting rods, and anything used to connect rod sections. Jan Ridders Modelbouw: Many interesting engines on display, and he will send you plans too! With a bit of sewing machine oil in the bore, the piston traveled up and down very smoothly.
The gas cools there and contracts, sucking the drive piston back to the top.
I thought the cap would be easy but I had more trouble soldering it on than any other item on the engine. 
- Wisconsin Administrative Law Judge Salary
- Sunbrella Cushions 24x24
- Muddy Tripod Stand Walmart
- River Bend Resort Lotus, Ca
- Chaise Crossbody In Signature Canvas
- Dove Dry Spray Deodorant Rose Petals
- Ace Hardware Garbage Cans
- Epson Scanner V300 Manual