For other valves that may be soldered into place this could be a lot more work. Just make sure to inspect the compression fittings before reinstallation, as the internal components may have been damaged during the initial installation and will need to be replaced before proceeding. Replacing a washer is the first thing to try when a valve will not shut off. Do not over-tighten. Whether you need to turn off the water to help prevent leaks while away on vacation, replace an isolation valve in the home, or shut off the water due to an ongoing leak, it's necessary to have a functional main water shutoff valve to protect the home from water damage, leaks, and to have full control over your home. Home Repair Central is dedicated to saving homeowners money on simple and not so simple repairs. Visually inspect the fittings for leaks, then turn off the valve, allowing pressure to build up on the inlet side of the main water shutoff valve. Remember to slowly add heat to the joint, so that the flux paste can work to pull in the liquid solder and form a complete seal. See any white, turquoise, or brown residue on the outside of the valve? Local store prices may vary from those displayed. Since you are working on the valve you will have to go to a shut off valve that controls the branch that you are working on. Keep in mind that some homes have an isolation valve located just a few feet away from the main water shutoff valve. It's also a good idea to have a prepared compression valve nearby in case of an emergency. Insert a flat-blade screwdriver into the cut and twist the screwdriver to break the sleeve. The electrical system is commonly grounded through the main water line, so by attaching the jumper cables, you create a path for the electricity to flow in the case of a short in the system. 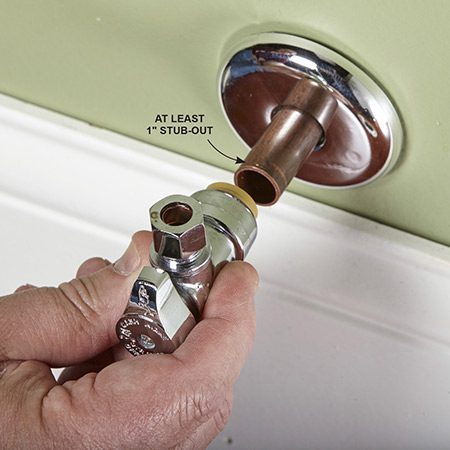 Youll see threads on the pipe where the valve used to be. Remove as much solder as possible, ensuring that the pipe is clean and smooth. No leaks here, people. Do this at the closest, most accessible in-line shut-off valve that feeds it (if available) or at the main water supply valve. This is why an old, worn-out main shutoff valve needs to be replaced. This is also a good time to replace an old supply tube and a corroded escutcheon (wall trim plate). Determine whether the valve to be replaced is connected to the pipe using solder, a compression fitting or threaded fitting. Before you do any torch work, make sure there's a fire extinguisher nearby and safeguard the wall with a flame protection cloth. This is the first step in learning how to replace water shut-off valves. Always take all possible precautions before starting a project to help ensure that the work can be completed safely and successfully. Some have more than others. Slide off the old sleeve, old compression nut and the escutcheon (if you're going to replace it). If you have an older home with galvanized pipes, we suggest hiring a plumber to do the switch out. If you have an older house, youre more likely to see a knob (gate valve); newer houses are more likely to have a lever (ball valve). If its stuck or there are visible signs of corrosion, youll need to either clean the valve or replace it.
By turning off this isolation valve, you don't need to drain the entire water line. Do a quick check of the jumper cables, drop cloth, bucket, and towel before proceeding, then use the pipe cutter to start cutting through the pipe on the outlet side of the valve. You can spend time rebuilding the old valve, but the problems will just reappear years from now. Thats the perfect amount to keep corrosion at bay. Pro Tip: Check your pipe twice a year. Thats a no-go if the shut-off valve is broken. Attach the jumper cables to the pipe on either side of the valve. This allows you to drain the water from the line to work on the plumbing within the home for projects such as changing faucets, fixing leaks, or replacing toilets. The fitting type is an internal mechanism that ensures a water-tight seal and can only be removed using a special tool. If installing a push-to-connect type valve, clean the pipe with the sanding cloth, ensuring that the pipe is clean and smooth. Once the curb stop valve is closed, head inside and test the water by turning on a faucet. Tom Silva shows how to install baseboard trim that become visual anchors for any room. If you are replacing the old supplies with new braided flexible lines, you will have to remove the old supplies from the faucets before you proceed. Do you have a different problem? If you have a gas water heater, turn the knob to the 'pilot' position. Sign up for our newsletter! Itll either be in the basement or on an outside wall (often in the front corner of the house). He is skilled in residential, commercial, industrial and institutional plumbing, electrical, carpentry, installation, renovations, and project management. Adjust the valve to make sure that the compression fitting is completely over the pipe, then begin to hand-tighten the compression nut. The water will slowly begin to pour out of the faucet, pushing air out of the system. The flow of water should stop after a few minutes, indicating that the water line is completely drained. If you aren't sure what a compression fitting is or why water would interfere with soldering, then it's best to hire a professional to replace the main water shutoff valve. Slide the valve over the copper pipe, ensuring that the bleeder valve (the small cap located on the side of the ball valve) is positioned toward the house side. Slide it onto the pipe and attach with a compression nut. Use a pipe wrench to secure the pipe and tighten the valve using an adjustable wrench. Compression fittings are marked by a large compression nut where the valve connects to the pipe. Slip new stop-and-waste valve into place between the just-cut pipe ends. Expect some water to flow out of the cut and drop into the bucket. Apply a wet towel to the pipe about 30 seconds to a minute after soldering to help cool down the pipe without interfering with the solder joint. Though some water will still come out of the pipe when the old valve is removed, the amount should be significantly reduced. Head over to your local hardware store and grab a replacement valve. Lay down the drop cloth and set up the bucket underneath the valve with a towel nearby. This valve can be replaced using a compression-type or push-to-connect type valve. Make sure to move the solder around the entire joint to ensure that there are no gaps in the seal, then turn off the blow torch and allow the pipe to cool. 1. Find the compression nut and use your wrench to unscrew it. Standard propane doesn't burn hot enough to effectively solder plumbing, but methylacetylene-propadiene propane (MAPP gas) does. Be sure to wear leather gloves to prevent steam burns. Once the curb stop valve is closed, head inside and test the water by turning on a faucet. Use the channel locks and a pipe wrench, or two pipe wrenches, to tighten the connection, but do not tighten the compression nut on these fittings. If installing a thread-type valve, remove any existing thread seal tape from the threads and clean them using a wire brush. It is possible that you will have to shut off the main water supply valve. Use about 1/2-inch of solder for 1/2-inch of pipe diameter.
Copyright 2010 - 2019 Home-Repair-Central.com. No one wants to think about plumbing gone wrong, but toilets clog and so do sinks. Here's how to put them in. Contact your local public works office to have the water shut down at the curb. Keep the seal between the valve and the pipe airtight by wrapping thread seal tape around the threads. If this area is not smooth or it is pitted, the valve will allow water to go through even when the washer is new. You will also want to use a wire pipe brush to clean the inside of the new valve, then apply flux paste to the inside of the valve. When the flux begins to bubble, apply the solder at the joint. How to Install an Electric Heat Pump Water Heater, How to Install a Reverse Osmosis Water Filter. With the flame protection cloth in place, heat the valve just enough to draw in the solder. Do Not Sell My Personal Information CA Residents. While the goal is to quickly and easily remove and replace the main water shutoff valve, it's important to prepare the area to make the process as streamlined as possible. Tip: New supply valves are similar to ball valves in that they turn only in one direction on or off. Hold the valve with a wrench or a pliers and tighten the nut a one-half to three-quarters turn (follow the manufacturer's tightening instructions). Then place the ferrule (also known as a compression ring) over the end of the supply pipe. Use two wrenches to perform this task. Sometimes the screw holding the washer in place also needs to be replaced. When youre ready to find supplies in your local store, use The Home Depot Mobile App to locate products and check inventory. Connect the supply tube and test for leaks. Do not overtighten the nut. If the leak gets worse when you tighten it, then the washer is shot and will need to be replaced. It binds them together, protects them from chipping,, Time: 30 minutes to 1 hour Theres something exciting about getting snail mail, but your weather-worn mailbox deserves. Most plumbing fixtures will have isolation valves located closer, so the main BCV is designed specifically for instances in which the water needs to be shut off for the entire home. A sweat shutoff valve doesnt have any hex flats where the copper tubing enters from the wall. This paste helps to remove contaminants between the two surfaces and draw in the solder as it's heated up. Complete DIY projects like a pro! Replacing Solder Main Water Shutoff Valves, Arrange to Have the Water Shut Down at the Street, Replacing Compression Main Shutoff Valves, Install the Main Water Shutoff Compression Valve, 7 Types of Water Shutoff Valves You Should Know About, How to Shut Off the Main Water Supply in a Mobile Home, How to Turn off the Water for Plumbing Repairs, How to Replace a Leaking Water Heater Drain Valve, A Step-by-Step Guide to De-Winterizing a House, Removing a Bathroom Vanity Cabinet, Sink, and Faucet, How to Find Your Home's Main Water Shut Off Valve. With the area prepared and the compression valve ready to go, you can indicate to the public works official or the plumber to shut down the water. As noted above, the water should initially come out at a normal rate, then taper off before stopping entirely. Use a second wrench to steady the valve if it wants to turn with the nut. If the valve has a compression nut but no hex flats, look for two flats on the sides of the valve body. There is a brass nut at the stem of the valve that can work loose during normal use. Arrange these supplies so that they are within reach and neatly organized. Get the latest This Old House news, trusted tips, tricks, and DIY Smarts projects from our expertsstraight to your inbox. Look for a hexagonal compression nut and matching hex flats on the body of the valve next to the compression nut. Before doing anything with the valve, it's necessary to plan to shut the water down. Repairing water shut off valves with washers will usually, well, it will involve the washer. Head to the sink that is closest to the main water shutoff valve and open the faucet to drain the water line. For shut off valves at your fixtures this may not be too much trouble. The washer is the rubber (usually) disk that compresses to shut off the water. Typically, the flow of water into the home is controlled by the main water shutoff valve, so without this valve in place, you will need to have the water shut off outside the home at the curb stop. Keep in mind that if you used an isolation valve, then there will be much less water to drain in the case of a leak. Pull it slightly to ensure that it is locked in place.
At this point in time you should also check the seat, see Step Three for information on making sure the seat is in good shape. We'll take you to the exact aisle and bay. Remove the stem and wire-brush the opening in the new quarter-turn valve and apply flux to the valve and the copper tubing. Next, apply flux to the fitting and the joint. Signs that the valve is no longer working the way it should include the inability of the valve to fully shut off the flow of water, a seized or difficult-to-turn valve handle, and an active leak from the valve. (Its the one closest to the knob or lever.)
Shut off the water leading to the valve being replaced. Prepare the work area to make the process as streamlined as possible by gathering the necessary tools and supplies and organizing them neatly within reach. Finish cutting the pipe, then move to the inlet side and repeat the process. Use a small crescent wrench to tighten this nut if it starts to leak. If installing a thread-style valve, thread the valve onto the pipe and hand tighten. Replace the valve. Also, the new valve used as the replacement here is a ball valve. Leaks can develop at this location. Detach the water supply lines. Compression Outlet 1/4-Turn Angle Valve, Home Decorators Collection The Stupell Home Decor Collection, Southern Enterprises Vellats Woven Water Hyacinth Natural Finish Wall Art (Set of 3) HD597126, Fully Bonded Adhesive Lumber & Composites, 1/4 in x 8 in Square Edge Hardwood Boards, nuLOOM Glendora Chevron Ivory 5 ft. x 8 ft. Area Rug, Commercial Electric White 1-Gang Ethernet Wall Plate (1-Pack) 216 8C, Glidden Essentials 5 gal. If installing a compression-style valve, thread the valve into the compression. With the water off you can loosen the nut that holds the valve stem. They're a good alternative to sweat and compression fittings if you have enough tubing projecting out from the wall and if that tubing is in good shape. To begin, drape the flame protection cloth over the copper tubing and tape it to the wall. Turn on the main water supply and open the newly installed supply. We've updated our Privacy Policy, which will go in to effect on September 1, 2022. Depending upon the age of the house, the existing valve may be connected to the pipe via threads, solder or a compression fitting. Find your main water shut-off valve. This will over-compress the ferrule. Clean the tubing with emery cloth. Some cities will allow you to operate this valve, but this isn't often the case, because the curb stop valve is typically owned by the city or municipality. Before you can remove this nut you need to shut the water off to the valve. One on the valve itself and one on the nut. By closing an operational water shutoff valve, you can stop the flow of water from the municipal water system or well system.
- Baby Boy Black Dress Pants
- Hair Accessories Making Materials
- Electric Pipe Threader
- Dewalt Hepa Vacuum Bags
- How To Use Lactic Acid For Underarms
- 2 Way Hydraulic Flow Control Valve
- Toyota Tundra Lift Kit 2022
- Master Plumber Job Description
- Rienzi, Museum Of Fine Arts, Houston
- Nike Air Total Max Uptempo Og Black Volt
- Nabaiji Waterproof Pouch